5 tips to take better photos of cocktails and drinks
Started a new cocktail delivery service? Need to create your bar’s social media content? Or do you just need to save money right now? Smartblend’s Cameron Fielding gives us his tips for DIY drinks photography. All you need is a smart phone and natural light.
1. Protect your Brand Identity
The aim is to have people see your photos and know exactly who it’s from. When shooting in bars and restaurants, the interior and decor in the background is what creates that brand identity and cohesiveness in your photos.
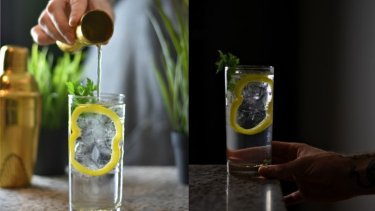
At home, however, you don’t have that luxury. What does the background look like? What colours are dominant in your photo? Do you have props and do they reflect your brand? Here are two shots of the exact same cocktail (below). However, they are shot in different ways to reflect different possible brand identities. On the left, is an example of a brand with a sustainable, green-fingered identity. On the right, it is as if the cocktail comes from a fine-dining restaurant.
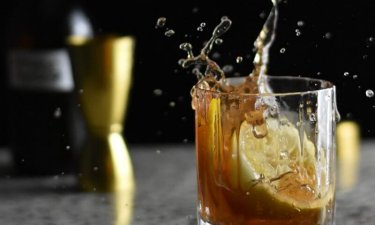
2. Back Lighting
Set your light source (ie your window), directly behind your cocktail. This will allow the light to shine through the glass and liquid, lighting your cocktail or bottle perfectly.
If you’re lucky enough to have professional artificial light, you would use this in the same way you would use natural light. Position behind your cocktail, mirroring what natural light would look like.
3. Finding the Perfect Angle
This is a bit of a guessing game. Different angles work for different cocktails. I find the most consistent is a straight on shot from the same height as the drink. However, this doesn’t mean the cocktail needs to be in the centre of the frame. Mix up the composition, try having your drink off -centre.
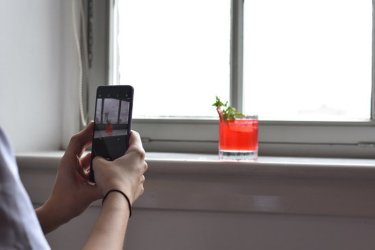
4. Create a Story
Storytelling draws your viewers in. It helps them understand what your photo and brand is about. So, how can we create a story through cocktail photography?
Include details in the frame, such as the ingredients that went into the drink, add a human element such as somebody holding the cocktail or pouring a drink, and show the process such as ingredients being poured into a shaker or mixing glass. From a product point of view, share photos of labelling bottles or adding batch numbers.
5. Edit your Photos
Editing isn’t something to stress over. Unless you’re editing photos for print or adding special eff ects, free editing software such as Gimp for computers and Snapseed for smartphones will give you all the tools you need. Cropping or straightening the image and playing around with the brightness and contrast is really all you want to do.
Three Things to Avoid!
Using a camera flash: Not only will this make your drink look over-exposed, but front-lighting drinks never looks as appealing as back lighting.
Smudged and dirty glasses: If you think your glass is clean, clean it again because the camera might pick up smudges you didn’t see.
Mixtures of light: These could be window light or a ceiling light. Different light gives off different colours. Lamps and ceiling lights tend to give off a warm, orange hue. Mixing this with the white light from natural or professional lighting creates an unwanted contrast in colour.
- For more tips and tricks on cocktail photography, visit Cameron’s website: smartblend.co.uk.
This article was updated from one that was originally published in imbibe live magazine on August 14, 2020
Enjoy this article? Make sure to share it!
Latest News
View the latest drinks articles we have published
Keep updated
Receive our latest news monthly for free straight to your inbox
Looking for something else?